| Doc. Number | Article Title | Effective Date | Version |
| FHC-XX | User Roles and Permissions Guide | March 31, 2026 | 1.1 |
This article was developed to review the roles, permissions, and assignments within the CRM. This article is divided into the following sections:
Overview
Roles define the user permissions or abilities in the FORTH CRM. Depending on the settings here, the user will have access to varying information or functionality within the FORTH CRM.
To begin, click the Admin Tab, and then click Roles available in the Navigation Bar.
The top left section of the "Roles" page should resemble the image shown below.
Create New
Below the navigation bar, you will find empty input fields for some items to create a new Role.
- Role Name - Input the name as you want it to appear when referenced throughout the CRM.
- Parent Role - Selecting another role here will make that role the level above the one you are creating or editing. This can help define the company hierarchy.
- Default Notes Type - Set a role's default note type; users can always select an alternative note type when entering.
- Assignable - This allows you to assign a user to contacts secondarily by role (See the Role Assignment section of this article for more information on role assignments).
Edit Existing
On the navigation bar of the Roles page, you will find a dropdown menu listing the current Roles. To edit a role, select that Role from the dropdown menu and make your changes to the role.
After editing the role, click Save (see red highlighted item in the image above). If you are creating a New role, you would click Save as New. You may also delete but be aware that you will not be able to recover the lost parameters.
NOTE: We do not maintain a central list of all available roles in the FORTH CRM, as most of them are custom-made for specific accounts.
Modules / Permissions
For each role, activate the Module/Tab (left-most column) and then enable permissions for the desired functionality within that tab. The example below shows users' permissions within the Contacts Tab. You may check the box next to the word "Contacts" to activate all permissions in that section (see item #1 in the image below). OR, you may select specific permissions by selecting specific checkboxes throughout the section. Review the different permissions and decide if the users with that role should have access.
In the redacted example image below, we gave this user access to "Add Notes" but not "Delete Notes" (see the arrows in the left column). You likely want to provide lower-level users with access to create data in the FORTH CRM but limit who can delete information to higher-level admin users.
*NOTE: We do not list all the available permissions here as we update or change them regularly. If you have questions about any permissions, please email Support@setforth.com.
Role Assignments
Role Assignment or Secondary Assignment can be used to assign additional users to a file based on their user role. This will allow you to not only have the "Assigned To" rep on the file, but also a secondary user based on their role. The secondary assignments can then be used as part of other functions within the CRM like triggers (Emails, Tasks, and Webhooks), list filters, and tags that will populate the secondarily assigned user of a file on email or document templates.
Making a Role Assignable
To enable a role as assignable, return to the Admin tab, and click Roles in the Navigation Bar.
Now, check the box labeled "Assignable" (see image below). For more information regarding editing user roles please visit our article here.
Once you make the role "assignable," you can assign the user by role with the Change Secondary Assignment link found in the left side panel of the Client Dashboard.
Once you have opened the "Change Secondary Assignments" layover, you will find options to assign users by role and also to assign companies by type. You can then highlight the users you wish to assign to the file. Once you have selected, click Update Assignments at the bottom of the layover window to save the assignments.
You will then find the users and companies assigned, labeled by their role/type on the Client Snapshot.
Enrollment Settings
If as part of your process a user or company needs to be assigned by their Role/Type, you can have the system prompt users to secondarily assign the user/company from the Enrollment Settings before the relevant enrollment step. Begin by going to the Enrollments tab, clicking Settings found in the Navigation Bar, and scrolling down to Role Assignment Settings. In the example below, we require a user to be assigned as a "Processor" before submission.
Once the setting is saved, after clicking Submit from the enrollment details page, the submitting user will be prompted to assign a user with the role before it will continue submitting the contact.
Setting Triggers for the Assigned Role
You can also set up triggers to be assigned to the Assigned Role. In the image below, we are setting an email trigger to be sent to the assigned "Processor" on the Submission of the client for Enrollment. In the "To" dropdown menu, select "Assigned Role" and a secondary dropdown menu will then appear to select the role. The same basic steps also apply to setting up Task Triggers and Webhook Triggers.
Lists
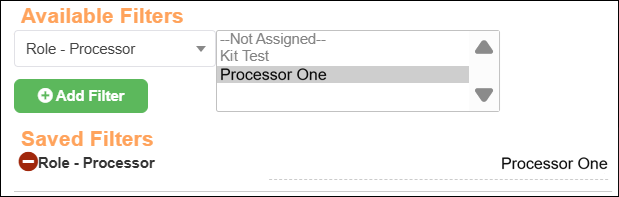
You may filter lists by an Assigned Role. You will find them in the "Filters" dropdown menu towards the bottom of the menu options. The filter will be labeled as "Role - ***Role Label***". In the example below, we are filtering by the Assigned Processor, "Processor One". This example list will populate leads where "Processor One" is assigned by the role "Processor."
Available Fields to Show
You will also find the Assignable Roles available to be displayed as data columns. Simply drag them from the Available Fields to Show group down to the "Show Fields on List" group.
NOTE: The image shown below only shows a sample of the available fields.
For more information on building lists, please visit our Contact Lists: Build, Filter and Edit article.
Template Tags
Template Tags are also available to populate information about the user assigned by role. Below, we display the name of the assigned processor on a document template. The format for the tag is {ROLE_***Role Label in All Capital Characters***} so, in our example, to populate the assigned "Processor" we would use the tag {ROLE_PROCESSOR}. We are also populating the Processor's phone number.
When generated the assigned Processor's information will then be populated on the PDF.
You can use the following tags to populate information about the assigned roles.
{ROLE_***ROLE LABEL***} - Full name of the user.
{ROLE_***ROLE LABEL***_PHONE} - The user's phone number is saved under their My Settings.
{ROLE_***ROLE LABEL***FAX} - The user's fax number is saved under their My Settings.
{ROLE_***ROLE LABEL***_EMAIL} - The user's email address is saved under the user's profile on the Admin tab.
Article Version History:
| Version | Date: | Description |
| Basic | 12/26/2016 | Initial Release |
| 0.1 | 08/18/2022 | Minor Updates |
| 0.2 | 04/20/2023 | Added header and version control footer; replaced all screenshots to better reflect the current user interface; updated email address to match the new email domain. |
| 0.3 | 10/12/2023 | Refreshed the "Contacts" screenshot (last on the page) to reflect the current options available. Refreshed additional screenshots for improved legibility. |
| 0.4 | 07/23/2024 | Refreshed the initial screenshot in this article and made minor grammatical updates for clarity. |
| 0.5 | 06/11/2025 | Grammatical review of the language and fixed any typos; updated the Contacts roles table screenshot to redact account-specific role options. |
| 1.0 | 01/08/2026 | Refreshed one screenshot to remove a redacted image. Refreshed two additional screenshots to reflect updates to the Triggers user interface. Absorbed content of "Roles Assignments" article, and changed title to reflect the merger. |
| 1.1 | 03/31/2026 | Refreshed broken hyperlink and minor grammatical updates. |